根据检测信息估算到场景中物体(汽车,行人,卡车)的距离
训练深度学习模型,该模型采用检测到的对象的边界框坐标并估计到该对象的距离
输入:边界框坐标(xmin,ymin,xmax,ymax)
输出:距离(Z)
https://github.com/harshilpatel312/KITTI-distance-estimation.git
# get images
wget https://s3.eu-central-1.amazonaws.com/avg-kitti/data_object_image_2.zip
unzip data_object_image_2.zip

# get annotations
wget https://s3.eu-central-1.amazonaws.com/avg-kitti/data_object_label_2.zip
unzip data_object_label_2.zip
放在Organize目录中
1
2
3
4
5
|
KITTI-distance-estimation
|-- original_data
    |-- test_images
    |-- train_annots
    `-- train_images
|
KITTI数据.txt转换到csv中
1
|
python generate-csv.py --input=original_data/train_annots --output=annotations.csv
|
KITTI中的txt结构
 1
 2
 3
 4
 5
 6
 7
 8
 9
10
11
12
13
14
15
16
17
18
|
#Values    Name      Description
----------------------------------------------------------------------------
   1    type         Describes the type of object: 'Car', 'Van', 'Truck',
                     'Pedestrian', 'Person_sitting', 'Cyclist', 'Tram',
                     'Misc' or 'DontCare'
   1    truncated    Float from 0 (non-truncated) to 1 (truncated), where
                     truncated refers to the object leaving image boundaries
   1    occluded     Integer (0,1,2,3) indicating occlusion state:
                     0 = fully visible, 1 = partly occluded
                     2 = largely occluded, 3 = unknown
   1    alpha        Observation angle of object, ranging [-pi..pi]
   4    bbox         2D bounding box of object in the image (0-based index):
                     contains left, top, right, bottom pixel coordinates
   3    dimensions   3D object dimensions: height, width, length (in meters)
   3    location     3D object location x,y,z in camera coordinates (in meters)
   1    rotation_y   Rotation ry around Y-axis in camera coordinates [-pi..pi]
   1    score        Only for results: Float, indicating confidence in
                     detection, needed for p/r curves, higher is better.
|
读取每个txt中每一行的content 然后splite,剔除 DontCare 标签的内容.
利用pandas重新建立表,利用函数 assign_values 映射其中的信息
最后将df存在一个csv文件中
利用 tqdm 建立了一个百分比进度条
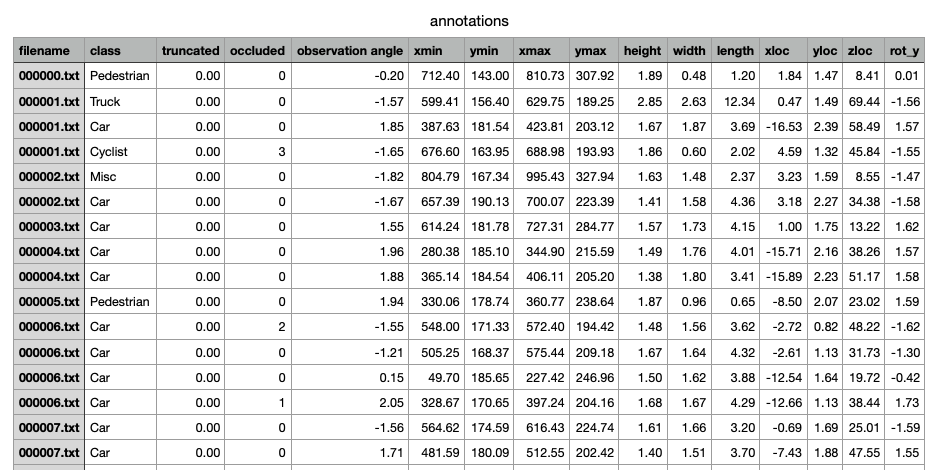
建立后的csv实例如下:
利用annotations.csv生成Dataset数据
generate-depth-annotations.py
 1
 2
 3
 4
 5
 6
 7
 8
 9
10
11
12
13
14
15
16
17
18
19
20
21
22
23
24
25
26
27
28
29
30
31
32
33
34
35
36
|
'''
Purpose: Generate dataset for depth estimation
'''
import pandas as pd
from tqdm import tqdm
import os
import numpy as np

df = pd.read_csv('annotations.csv')
new_df = df.loc[df['class'] != 'DontCare']
result_df = pd.DataFrame(columns=['filename', 'xmin', 'ymin', 'xmax', 'ymax', \
                           'angle', 'xloc', 'yloc', 'zloc'])

pbar = tqdm(total=new_df.shape[0], position=1)

for idx, row in new_df.iterrows():
    pbar.update(1)
    if os.path.exists(os.path.join("labels", row['filename'])):
        result_df.at[idx, 'filename'] = row['filename']

        result_df.at[idx, 'xmin'] = int(row['xmin'])
        result_df.at[idx, 'ymin'] = int(row['ymin'])
        result_df.at[idx, 'xmax'] = int(row['xmax'])
        result_df.at[idx, 'ymax'] = int(row['ymax'])

        result_df.at[idx, 'angle'] = row['observation angle']
        result_df.at[idx, 'xloc'] = int(row['xloc'])
        result_df.at[idx, 'yloc'] = int(row['yloc'])
        result_df.at[idx, 'zloc'] = int(row['zloc'])

mask = np.random.rand(len(result_df)) < 0.9
train = result_df[mask]
test = result_df[~mask]

train.to_csv('train.csv', index=False)
test.to_csv('test.csv', index=False)
|
主要内容是从annotations中,先剔除 DontCare 的内容
建立result_df的数据表
然后利用pandas的迭代器 iterrows
生成一个mask 将result_df 一九分开 存储在 train.csv 和 test.csv 中
这时,就有了包含filename, xmin, ymin, xmax, ymax, angle, xloc, yloc, zloc的文件
整合后的 data 数据如下:
 1
 2
 3
 4
 5
 6
 7
 8
 9
10
|
KITTI-distance-estimation
|-- original_data
|    |-- test_images
|    |-- train_annots
|    `-- train_images
`-- distance-estimator/
    |-- data
        |-- test.csv
        `-- train.csv
|
作者实现了一个显示工具 visualizer.py
利用 filename 信息 找到对应的图片,利用csv的(xmin,ymin,xmax,ymax)在图像上进行矩形标注
然后 imshow 后可以显示
利用 sklearn.preprocessing 中的 StandardScaler 对数据进行归一化
利用 adam 优化器进行优化
loss设置为 mean_squared_error
执行5000个epoch后
利用json保存model
利用h5保存weights
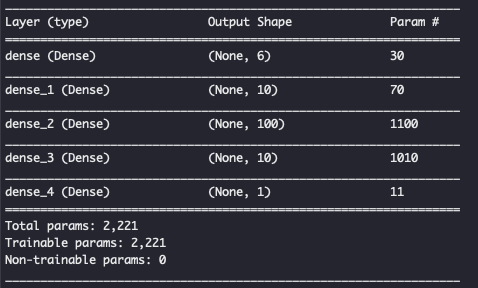
网络结构如下:(model.summary())
同样利用sklearn.preprocessing 中的 StandardScaler 对数据进行反归一化
load json and create model
load weights
1
2
3
4
5
6
|
json_file = open('generated_files/{}.json'.format(MODEL), 'r')
    loaded_model_json = json_file.read()
    json_file.close()
    loaded_model = model_from_json( loaded_model_json )

loaded_model.load_weights("generated_files/{}.h5".format(WEIGHTS))
|
然后遍历所有 test.csv 结果得到 y_pred
将数据与结果全部
同visualizer
tqdm例子
1
2
3
4
5
|
from tqdm import tqdm

with tqdm(total=100) as pbar:
    for i in range(100):
        pbar.update(1)
|